Camping CraftsThese camping crafts for kids will be enjoyed on your camping holiday. Enjoy these nature crafts while out camping in nature.

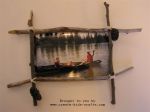
Twig Frame(camping crafts) Camping photos look especially good in a rustic twig photo frame. Supplies Needed: small or medium sized photo from your camping trip Trim each corner of the cardboard on a diagonal. Glue a long twig to each long side of the cardboard. Place a short twig along each short edge of the cardboard and glue them to the other twigs where they touch. Let the glue dry. Cut the ribbon or twine into four 8 inch(20cm)long pieces. Thread a piece of ribbon behind the twigs at the top of one corner. Cross the ribbon over the front of the twigs and then wrap it to the back. Tie a tight knot. Trim the ends of the ribbon and place a small amount of glue on the knot to secure it. Repeat on the remaining corners. Attach the photo to the frame by placing pieces of double-sided tape or loops of sticky tape in each corner of the back of your photo. Place your photo in position and press firmly to attach it. To hang your frame, cut a length of string or yarn and tie a knot at each end. Form the string into a loop and attach it to the frame by glueing a strip of construction paper just above the knots. 
Leaf Crown(Camping Crafts) Make a chain of large, flat leaves by piercing the stem through as far as it will go. The next leaf will hide the stem. Continue until your chain is long enough to go around your head. Make a circle by poking the last stem into the first.

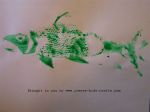
Fish Print(camping crafts) Supplies Needed: One real, whole fish The flatter the fish, the better the results. Before starting, wash the fish and pat it dry with papertowels. Brush paint on one side of the fish. Brush with, not against the scales. Paint the head, fin and tail thoroughly. Lay a sheet of white paper over the painted fish and carefully press it down against every part of the surface. Lift the paper and see your print. Don't chance eating the fish-toss it when you're done. 
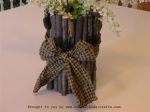
Twig Vase Supplies Needed: Break or snip your twigs to about an inch longer than the jar. Have an adult do if using pruning shears or clippers. Put two elastic bands around the jar, an inch from the top and the bottom. Begin tucking the twigs under both rubber bands, placing them as close as possible to each other. Once you've gone completely around the jar with twigs, slide the elastic bands together at the jar's middle and cover them with the paper ribbon, making a decorative bow with same. Glue on a few pinecones then add some flowers to your vase. Fun Camping Craft Kits and Ideas You Might Like:
|
Creative Playdough Ideas for Kids is a 32 page e-book that is downloadable in PDF format, and provides simple, step by step instructions for a variety of creations with full color photos throughout. Playdough creations include cat, turtle, lion, snail, pig, snowman, snake, two rose methods, daisy, daffodil, ladybug, faces, cup and saucer, a heart of flowers, fruit and butterfly. Click here for more details:


